Installation Procedure
![]()
Unplug the main machine power cord before you do the following procedure.
You can only install one of the following network interfaces at one time: (IEEE 802.11 a/g, (Wireless LAN), IEEE1284, Bluetooth).

Remove the slot cover [A] from the board slot (
 x 2).
x 2).Install the wireless LAN board [B] (Knob-screw x 2) into the board slot.
Make sure that the machine can recognize the option (see ‘Check All Connections’ at the end of this section).
Peel off the double-sided tapes on the Velcro fasteners [A], and then attach them [A] at the front left and rear left of the machine.
Attach "ANT1" (having a black ferrite core) [B] to the front left of the machine.
Attach "ANT2" (having a white ferrite core) [C] to the rear right of the machine.

"ANT1" is a transmission/reception antenna and "ANT2" is a reception antenna. Do not attach them at the wrong places.
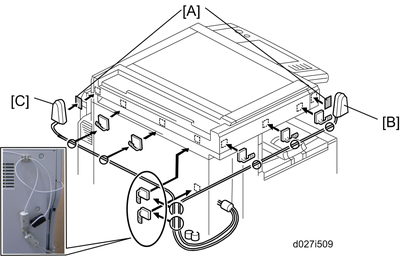
Attach the clamps as shown above.
Wire the cables and clamp them (
 x 7).
x 7). Make sure that the cables are not slack. Keep them wired tightly along the covers.
You may have to move the machine if the reception is not clear.
Make sure that the machine is not located near an appliance or any type of equipment that generates strong magnetic fields.
Put the machine as close as possible to the access point.
Installing Various Hardware Combinations

Refer to the above picture [A] when installing the handset.
Refer to the above picture [B] when installing the handset and the USB2.0/SD.