Selecting the Program Number
Program numbers have two or three levels.
Refer to the Service Tables to find the SP that you want to adjust before you begin.
Press the Group number on the left side SP Mode window that contains the SP that you want to adjust.
Use the scrolling buttons in the center of the SP mode window to show the SP number that you want to open. Then press that number to expand the list.
Use the center touch-panel buttons to scroll to the number and title of the item that you want to set and press it. The small entry box on the right activates and shows the below default or the current settings.
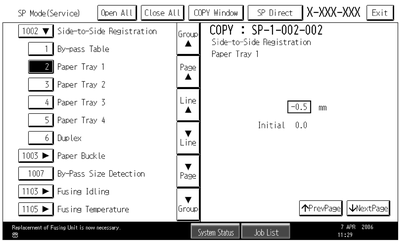

Refer to the Service Tables for the range of allowed settings.
Do this procedure to enter a setting:
Press
 to toggle between plus and minus and use the keypad to enter the appropriate number. The number you enter writes over the previous setting.
Press
 to enter the setting. (The value is not registered if you enter a number that is out of range.)
Press "Yes" when you are prompted to complete the selection.
If you need to perform a test print, press Copy Window to open the copy window and select the settings for the test print. Press Start
 and then press SP Mode (highlighted) in the copy window to return to the SP mode display.
Press Exit two times to return to the copy window when you are finished.