After installing the new laser optics housing unit
Do the following adjustment after installing the new laser optics housing unit.
Plug in and turn on the main power switch.
Adjust the main scan magnification for K, M, C, Y.
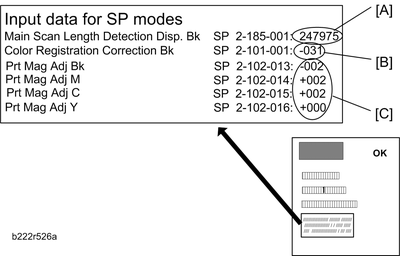
Input the standard values [C] provided with a new laser optics housing unit for the main scan magnification adjustment with SP2-102-013, 014, 015, 016.

The values [C] are different for each laser optics housing unit.
Adjust the main scan magnification only for black (K).
Input the standard value [A] provided with a new laser optics housing unit for the main scan magnification adjustment with SP2-185-001.
The value [A] is different for each laser optics housing unit.
Print the test pattern (14: 1-dot trimming pattern in the SP2-109-003).
Check that the left and right trim margin is within 4 ± 1 mm. If not, change the standard value for the main scan magnification adjustment.
Adjust the main scan registration only for black (K).
Input the registration value [B] provided with a new laser optics housing unit for the main scan registration adjustment with SP2101-001.
The value [B] is different for each laser optics housing unit.
Print the test pattern (14: 1-dot trimming pattern in the SP2-109-003).
Check that the left trim margin is within 2 ± 1 mm. If not, change the registration value for the main scan registration adjustment.
Select "0" with SP2-109-003 after printing the "1-dot trimming pattern.
Do the line position adjustment.
First do SP2-111-3.
Then do SP2-111-1.
To check if SP 2-111-1 was successful, watch the screen during the process. A message is displayed at the end. Also, you can check the result with SP 2-194-10 to -12.
Exit the SP mode.
After you replace the housing unit, do the adjustments in the following section of the manual: Image Adjustment – Registration.