- Turn the main power ON.
- Enter the SP mode, input the appropriate number for SP2-400-001 (NV Clear at Head Replacement) and execute it.
- Input "1" when replacing H1.
- Input "2" when replacing H2.
- Input "4" when replacing H3.
When replacing multiple heads, input the sum of the numbers. For example, when replacing H1 and H3, the number to be inputted is 5 (1+4=5).

The air purge time change flag (SP2-270-***) for the print head you specify will be "1".
- Press the [Maintenance] key.
- Press [Special Maintenance].
- Press [Air Purge].
- Select a print head to be performed from [Head 1], [Head 2], or [Head 3].
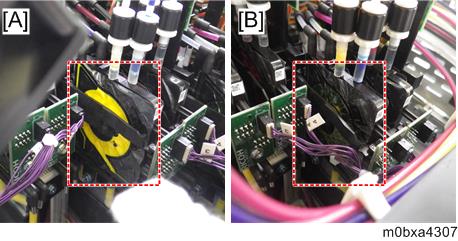
When the air purge maintenance is completed, the value of SP2-012-001, which has been changed in step 2 of "Work before Replacing the Print Head Unit", will be changed to "0". - Repeat steps 3 through 6 until the damper is filled with ink. Make sure you visually check the damper.
[A]: OK
[B]: NG