The Flow of Initial Filling
| No. | |
|---|---|
| 1 | Set 4C cartridges, a flushing cartridge, a web cartridge, and then turn the power on. |
| 2 | Empty the waste ink bottle. |
| 3 | Set the waste ink count to 0. (SP7-962-012) |
| 4 | Fill the cleaning liquid. (SP2-012-006) To execute the SP, select "1". |
| 5 | Set initial operation setting value to 1. (SP2-012-001) |
| 6 | Remove the cartridge. |
| 7 | Set the jig used for discharging liquid, and then close the cartridge lock. |
| 8 | Discharge the filling liquid. (SP2-012-002) To execute the SP, select "7" for all heads. |
| 9 | Remove the jig used for discharging liquid. |
| 10 | Insert the ink cartridges. |
| 11 | Fill the liquid. (SP2-012-003) To execute the SP, select "7" for all heads. |
| 12 | Rewrite the air purge flag. (SP2-012-004) To execute the SP, select "7" for all heads. |
| 13 | Open the front cover, open the air purge port of H1, set the tray, and then close the front cover. |
| 14 | Perform air purge for H1. (SP2-012-005) To execute the SP, select "1" for head 1. |
| 15 | Open the front cover, close the air purge port of H1, remove the tray, and then close the front cover. |
| 16 | Perform head cleaning for H1. (SP2-010-001) To execute the SP, select "1" for head 1. |
| 17 | Open the front cover, open the air purge port of H2, set the tray, and then close the front cover. |
| 18 | Perform air purge for H2. (SP2-012-005) To execute the SP, select "2" for head 2. |
| 19 | Open the front cover, close the air purge port of H2, remove the tray, and then close the front cover. |
| 20 | Perform head cleaning for H2. (SP2-010-001) To execute the SP, select "2" for head 2. |
| 21 | Open the front cover, open the air purge port of H3, set the tray, and then close the front cover. |
| 22 | Perform air purge for H3. (SP2-012-005) To execute the SP, select "4" for head 3. |
| 23 | Open the front cover, close the air purge port of H3, remove the tray, and then close the front cover. |
| 24 | Perform head cleaning for H3. (SP2-010-001) To execute the SP, select "4" for head 3. |

When you cannot perform this procedure normally, refer to "Troubleshooting Information When Performing Initial Filling and Full Auto Cleaning".
Set the four ink cartridges to the main unit as shown below.
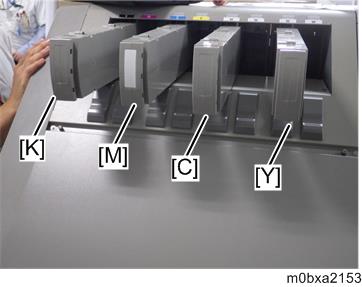
- Set the ink colors as the picture shown above for both 4C and 4C+W model.
- The machine is in the state of 4C model with the factory-default setting. If the customers use the machine in the state of 4C+W model, the setting needs to be changed to 4C+W model when installing the machine (Installation for 4C+W Model). In this step, ink cartridges need to be set in the ink configuration for 4C model, because the machine is in the state of 4C model (factory-default setting) when installing the filling liquid.
- Move the lock lever [A] upward so that the main unit recognizes the ink cartridges.
